
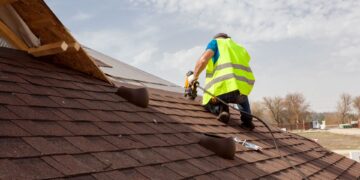
Are you thinking about installing a metal roof? Before you order panels or climb a ladder, there’s one thing you can’t skip: accurate measuring. It’s the first thing that makes the rest of the job easier and cheaper. And it’s easier than you might think. If you’re ready to learn how to measure for a metal roof the right way and avoid costly mistakes, read on!
Tools and Materials You’ll Need
Yes, metal roofing is one of those upgrades that can make your home look better, feel sturdier, and even raise its value. But before you start measuring for a metal roof, gather the right tools and gear to make the job easier and safer. You don’t need anything fancy. Just make sure you have the basic measuring tools and safety equipment.
Basic Tools
Start with a measuring tape that’s at least 100 feet long. Roofs cover a lot of space, and shorter tapes can make the job harder. You’ll also need a notebook or a printed roof measurement sheet to record your numbers. Use a pencil so you can erase and adjust as needed. A calculator is helpful for quick math as you go.
Safety Gear
Measuring a roof means working at heights, so safety is a must. Use a sturdy ladder and a safety harness if you need to climb up. Wear non-slip shoes to avoid slipping on shingles or panels.


Optional Tools
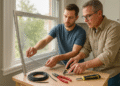
If you want to speed things up, consider a roofing calculator app or digital measuring tools. These can help estimate materials more accurately, especially for complicated roof shapes.
Getting your tools together first saves time and lowers the chance of messing something up.
Step-by-Step: How To Measure for a Metal Roof

Measuring your roof the right way helps you avoid wasted materials and extra costs. Follow these steps to get the numbers you need for your metal roof project.
Step 1 – Identify Your Roof Type
Start by looking at the shape of your roof. Is it a simple gable, a hip roof, or something more complex? The shape will guide how many sections you’ll need to measure. If your home is located in an area with changing seasons and snowfall, like those covered by Madison metal roofing services, the roof type can also affect the kind of panels and fasteners you’ll need.
Step 2 – Measure Length and Width
Using your tape measure, record the length and width of each roof section. If your roof is too high or unsafe to walk on, measure from the ground and use a drawing or plan to help map it out.
Step 3 – Find the Roof Pitch
Pitch is the slope of your roof. Use a level and tape to measure how much the roof rises over 12 inches. Write this down as pitch affects the total surface area.
Step 4 – Add Overhangs and Eaves
Don’t forget to include roof edges that extend beyond the walls. Measure these and add them to your totals.
Step 5 – Add a Waste Margin
Add 5–10% extra to cover cutting and overlaps during installation.
Converting Area into Metal Panel Needs
Once you’ve calculated the total surface area of your roof, the next step is figuring out how many metal panels you’ll need. Metal panels come in standard widths, often 24, 26, or 36 inches wide. They’re also available in various lengths depending on your roof’s slope and design.
Start by converting the total roof area from square feet to square inches (multiply by 144), then divide that by the width of the panel in inches. This gives you the total linear inches of panels needed. Divide again by 12 to get feet. That’s how much panel length you’ll need across the roof.
Also, consider how the panels will be laid out. Some roofs work best with panels running vertically from ridge to eave, while others might need horizontal placement depending on roof type and style.
Be sure to round up and include extra panels to account for overlaps, cuts, and mistakes. Having too few panels can cause delays, especially if you need custom sizes.
Final Checks Before Ordering
Before placing your order for metal roofing materials, take a few minutes to double-check your numbers. Go over each section of your roof and make sure all measurements were written down correctly. Even a small mistake can lead to ordering too little—or too much—material.
Review your total roof area and confirm that you’ve included overhangs, eaves, and any add-ons like porches or dormers. Make sure your waste margin of 5–10% is added to cover trimming and fitting.
Look at your panel layout plan to see if your panel lengths and widths match your roof design. This helps avoid gaps or awkward seams.
If you’re not completely sure about your measurements or roof style, it’s a good idea to speak with a roofing supplier or contractor. They can look over your figures and offer advice before you buy.
Doing this early helps you skip delays, extra costs, and headaches once installation begins.
Plan It. Measure It. Nail It.
Measuring a metal roof isn’t hard if you take it step by step. With the right tools, clear steps, and a little planning, you’ll set yourself up for a smooth install and long-lasting results. Get your measurements right from the start, and your roof will be one less thing to worry about. Good luck!


